Lenses and Optics

Sharpening Maps and Masks

Published April 5, 2013

Obviously I’m a gearhead, so I like to know the traits of the lenses I shoot with. I want to know what aperture gives maximal corner sharpness, for example, whether the plane of focus is curved or flat, where the distortion changes in a zoom, which end of the zoom range or focusing distance is the lens sharper at, and a number of other things you may not care a bit about.

Does it improve my composition and technique? No. But knowing this stuff can be helpful. For example, when I want to shoot a landscape at 70mm and f/5.6 will my corners be sharper with my 24-70 f/2.8 or a 70-200 f/2.8? Or which will have less distortion for an architectural shot (since I hate the resolution loss of correcting distortion in post), my 35mm f/1.4 or my 24-70 zoom at 35mm? (Surprisingly, the answer is my zoom.)

This kind of information is easy to find. DxoMark has nice graphs for each lens that show distortion, vignetting, chromatic aberration, and resolution at various focal lengths and apertures for each lens they test. SLRgear.com has a nice pop-up app that shows the resolution across the field of the lens at various apertures and focal lengths.  The Digital Picture has great pop-ups that let you compare two lenses side-by-side for flare, distortion, vignetting and even images of ISO 12233 crops.

A lot of people use those tools when deciding which lens to buy. I use them after I have the lens so I know how to best use it.

 Resolution Maps

One thing that I’ve started using more frequently in post processing is a resolution map of the lens. We all know that every lens has highest resolution in the center and less in the corners. But the pattern of sharpness is different for different lenses.

Some lenses have a high peak of resolution right in the center that quickly drops off. Others maintain significantly high resolution halfway to the corners and then drop like a rock. Others have a rather linear drop-off from the center to the corners.

Just as an example, below are 6 Imatest charts showing MTF50 of 6 different lenses across the field of view. The absolute resolution numbers aren’t important for this demonstration, rather it’s the pattern of how the resolution changes. For each lens, yellow is the highest MTF50, blue is about 1/3 the value of yellow.


Imatest resolution maps of 6 lenses.. Yellow is highest resolution, blue lowest.

Why Does it Matter?

There are a lot of reasons, of course. But one I use a lot is creating sharpening maks for postprocessing. Like a lot of people, I use a masked layer for sharpening, applying less sharpening to the already sharp center of the image, and more sharpening to the softer areas. Instead of just a generic oval, I try to make a mask that mirrors the resolution map of the lens I’m shooting with.

I keep masks as actions for my most commonly used lenses, which speeds up postprocessing considerably. For example, I’d use something like the first mask, below, for images shot with the lens on the upper left above, and the second mask for middle right lens above.

 

Sharpening mask for the upper left lens from Figure 1.

 

Sharpening mask for the middle right lens from Figure 1.


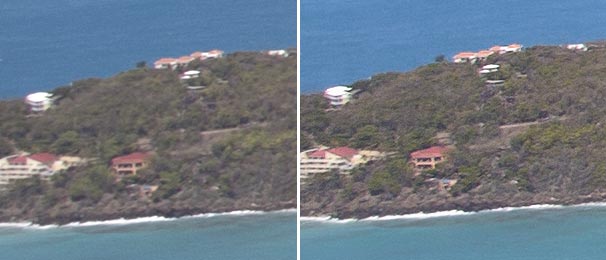
As an example I’ll use two 100% crops from the left edge of this snapshot.


The crop on the left shows what that edge looks like when I sharpened the entire image to give best center sharpness. The crop on the right was when I used a mask to use stronger sharpening, but only at 50% strength in the center of the image. With either technique the center looked the same, but the edges were quite different.

Of course you can simply use an oval mask and adjust it for each image with a bit of trial and error. But I had 500 vacation photos to go through. Since 75% of them were taken with one lens at the same aperture, saving an action with the appropriate sharpening made that quick and easy.

You don’t need Imatest to figure out the sharpness pattern for the lenses you have. A simple photograph of a flat wall or fence with reasonable detail (bricks or unpainted wood are nice) will let you see where each lens starts to soften and by how much. Once you’ve made a good mask for that lens you have it forever. For most lenses, the same mask can be used at different apertures – you simply reduce the strength of the layer if you’ve shot stopped down. For other lenses, though, like my Zeiss 50mm f/1.4, you will need to make masks for different apertures.

Uwe Steinmueller at OutbackPhoto.net and I have been doing a series of articles trying to show how a little gear head knowledge and a little post-processing knowledge compliment each other and help make better images, and this is a great opportunity for that. Uwe’s article and action for corner sharpening, provide a nice photographic demonstration of how sharpening with a mask improves your end result, and a nice script with an adjustable mask.


Roger Cicala

Lensrentals.com

April, 2012

Author: Roger Cicala

I’m Roger and I am the founder of Lensrentals.com. Hailed as one of the optic nerds here, I enjoy shooting collimated light through 30X microscope objectives in my spare time. When I do take real pictures I like using something different: a Medium format, or Pentax K1, or a Sony RX1R.

Posted in Lenses and Optics
  • Brian

    Any chance you might post your PS actions Roger? I’m sure there’s quite a few of us using your favourite lenses!

    Even just your masks would be appreciated!

  • Have you thought about combining this technique with the QImage idea of sharpening colors different amounts based on the Bayer array causing red and blue to need more sharpening than green?

  • Roger, thanks for the interesting idea. I had thought that I would have trouble implementing the concept because I generally have to apply some (sometimes a lot) of perspective adjustment when I “develop” my RAW files in Lightroom, which would result in non-circular/oval masking being required (plus a trip to Photoshop). Then I realized that within Lightroom, I could just paint in additional corner sharpening as required with the Lightroom adjustment brush. Now I have to shoot some brick walls to see just how much extra is required and what the locations for application are when different amounts of perspective correction are applied. Geeze, thanks a bunch for that, Roger…. But seriously, great post.

  • Thanks for your publication on this weblog. From my own personal experience, there are occassions when softening way up a photograph may well provide the photographer with a little bit of an artistic flare. Many times however, this soft cloud isn’t what exactly you had planned and can often times spoil an otherwise good photograph, especially if you thinking about enlarging them.

  • >As the chips get smarter, there is no reason this can’t be done relatively simply in camera,

    True, but:

    1. We live now 🙂
    2. Bad experience with many things “auto”

  • Bruce

    As the chips get smarter, there is no reason this can’t be done relatively simply in camera, or at the other end of auto wifi. Just a few menu choices should suffice, as long as the camera knows what lens it is.

  • PeterK

    Roger > I see. It actually makes sense to have oval sharpness distribution, most cameras have rectangular frames, not square. Lens designer input would be nice. Although they don’t seem to hang around photo blogs too much 😀

  • THX723

    I believe Canon’s DLO (Digital Lens Optimizer) does the trick, but am not 100% certain. Sounds like more homework for Roger!?! 😛

    -Clint

  • Roger Cicala

    Jim and Peter,

    I don’t know. I’ve got some ideas, so consider this thinking out loud.

    My first thought is remember with Imatest we’re looking at lens/camera output combined. I wonder if microlens alignment on the camera sensor might be contributing? I’d need to find a lens with that characteristic that comes in several mounts (Zeiss, Sigma, Tamron) to investigate that further. But then, it may be possible that everyone’s microlenses are similar and that won’t show anything.

    I know when we adjust certain lenses for centering, we can occasionally get a very high center resolution by slightly decentering the lens, although this adversely effects corner resolution and often gives an oval pattern to resolution over all. In the same vein, when optically adjusting zooms we can create oval patterns — adjust too far one way and the lens is sharp top to bottom but soft on both sides, adjusted another and it changes to sharper on the sides and not on top and bottom. Either way its an oval pattern.

    Taking that a step further, when doing such adjustments we’ll often get better corners and better overall averages by having the lateral sides a bit higher resolution than the top/bottom (makes sense – the sides are further from the center).
    We’re doing that accidentally, but it seems possible a lens might be designed that way in order to give maximum center sharpness at the expense of corner sharpness, perhaps, or in order to minimize some form of aberration.

    I’d also add there are some zooms when we can see the pattern of best sharpness rotate as we zoom in and out a bit. Since elements rotate 60 degrees or so during a zoom or focus move from one extreme to the other, it makes me think it’s a real optical phenomenon and not some artifact of testing. But the latter is always possible, too.

    We need a lens designer to come by and enlighten us all.

    Roger

  • PeterK

    Jim > One thing I’ve wondered about is why some lenses have oval sharpness characteristics? It seems like they should all be circular.

    My question exactly 😉

  • Jim

    Roger,
    One thing I’ve wondered about is why some lenses have oval sharpness characteristics? It seems like they should all be circular.

  • >Until then, I find it’s best to sharpen these areas conservatively … some lingering blur looks better than sharpened smear.

    Right, “conservatively” is the word.

  • Paul R

    It’s a great idea. Some individual tweaking may be in order for lenses that exhibit noticeable astigmatism. These lenses tend to “smear” detail toward the corners, in a way that I find isn’t so ammenable to standard USM-based sharpening. Someone will probably figure out a deconvolution method that deals with these asymmetrical blurs. Until then, I find it’s best to sharpen these areas conservatively … some lingering blur looks better than sharpened smear.

  • >The one impractical thing about all this is that you have to use different mask for each aperture.

    Good point. I would just use it to improve and not trying to be perfect (does not work anyway :-))

  • PeterK

    Great advice. I was actually thinking about lens-sharpness-mask sharpening for some time. The one impractical thing about all this is that you have to use different mask for each aperture. So it might not be that practical for large number of images. Unless of course you tend to shoot at limited aperture sizes. Also using zoom lens would make things more complicated.

    However this is excellent option for tweaking the selected best shots.

  • Esa Rahiala

    Many thanks, this gave me new understanding about possibilities in digital post processing and ways to minimize that on the other hand.

  • Roger Cicala

    Steve, that would be one copy of each lens.

  • Roger Cicala

    Esa, the crater-peak one is a lens with a lot of astigmatism. The chart averages horizontal and vertical resolution at each location and the result is that roller coaster map.

  • >Thing is it does negate any cropping in the raw converter…

    Not if you would do it prior to cropping.

  • Ben

    Thing is it does negate any cropping in the raw converter…

  • Steve Runyan

    how many lenses does DXO test to arrive at these maps?

  • Esa Tuunanen

    That last resolution map looks like crater with central peak or volcanic structure. 😉
    Left middle one sure has sucktastic resolution downhill starting immediately outside center.

    Wouldn’t it be nice if lens makers provided ready masks available for download…
    Then again can we expect them to admit that awfully lots of lenses are optically underdesigned/sized?

  • >Why aren’t you just using DxO or some other RAW processor with lens profiles built in as part of your workflow as DxO

    DxO tries to deal with corner sharpness (don’t know any other RC that does though). Two issues here:

    1. There are many lenses/camera combinations not supported by DxO
    2. The workflow choice maybe in favor of other RCs (I use mainly Lightroom). DxO is a good RC but also quite slow and the UI is a bit convoluted for my taste.

  • Roger Cicala

    Dave, I’m off on the lecture circuit next weekend, so no NAB for me.
    Roger

  • Roger Cicala

    Stephen, great minds think alike 🙂 But am I missing something? My version of DxO’s maps don’t appear to follow the resolution map of the lens at all. For example, the Zeiss 50mm f/1.4 (pinpoint center sharpness wide open, falling off very rapidly wide open; wide area center sharpness at f/4 almost 2/3 of the way to the corners) doesn’t map out that way at all in DxO.

    On the other hand I don’t have the newest version. Maybe they’ve changed it?

    But they do a lot of wizardry that is impressive.

    Roger

  • Stephen Froehlich

    Roger, I have to ask if you’re going to this much trouble:

    Why aren’t you just using DxO or some other RAW processor with lens profiles built in as part of your workflow as DxO (I don’t know about the others) not only applies a mask like this but sharpens each color a different amount in the meridonial and the sagittal directions based on their lens profile?

    I know they don’t test many lenses, but it would be very good starting point.

  • Great stuff as usual Roger, are you going to NAB next week?

Follow on Feedly